How to Optimize Profile Milling :A Guide to Processes, Tools, and Best Practices?
Table of Contents
1.Introduction to profiling milling
1.1What is Profile milling?
Profile milling is a machining process where a rotating tool is used to cut away material from a workpiece, shaping it into the desired form or surface. This method is widely used in CNC (Computer Numerical Control) machining and is effective for a range of materials, including metals, plastics, and composites, to produce parts with intricate and precise shapes.

1.2 Commonly used materials
Profile milling can be used on a wide variety of materials, making it a versatile machining process. Some of the most commonly used materials include:
Metals: These include materials like aluminum, which is lightweight and easy to machine, as well as stainless steel, known for its strength, durability, and resistance to corrosion. Profile milling can effectively shape both soft and hard metals.
Plastics: Common plastics like ABS (Acrylonitrile Butadiene Styrene) and polycarbonate are frequently milled. These materials are lightweight, have good impact resistance, and are often used in applications where flexibility or transparency is important.
Composites: Materials like carbon fiber and fiberglass are also suitable for profile milling. These composites are prized for their high strength-to-weight ratios and are commonly used in industries such as aerospace, automotive, and sports equipment. Milling these materials requires special tools to prevent damage and ensure a clean finish.
Each material requires specific tools, speeds, and techniques to achieve the best results, making material selection a critical factor in the profile milling process.
2.Profile Milling Process
Profile milling is a process used to shape complex, three-dimensional surfaces on a workpiece. This is done using a multi-axis milling machine, which allows the cutting tool to move in several directions. The tool gradually removes material from the workpiece, shaping it into the desired form. The process typically involves three main operation steps:
Roughing: In this initial step, large amounts of material are quickly removed from the workpiece. The goal is to reduce the size of the part and get it closer to the desired shape, leaving some extra material for more precise work later. Roughing is typically done using larger, more aggressive cutting tools to speed up the material removal process.
Semi-finishing: After roughing, the semi-finishing stage fine-tunes the shape of the part. The cutting tool refines the contours and edges, preparing the surface for the final finishing stage. At this point, more precision is required, and smaller tools may be used to achieve more detailed features, but there’s still some material left to be removed.
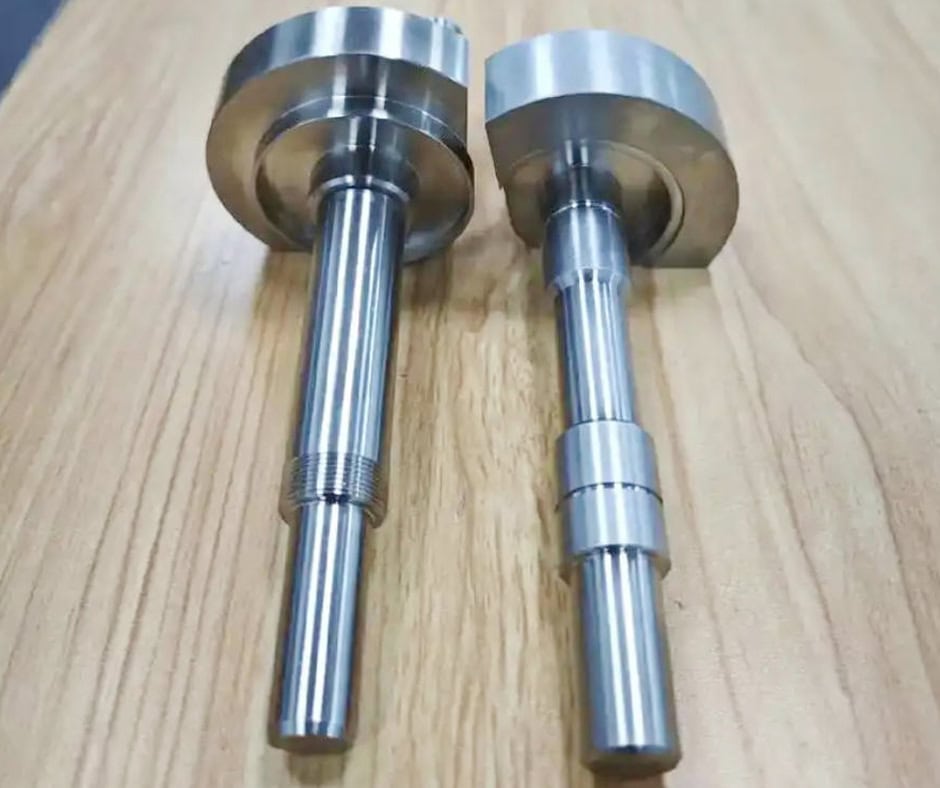
Finishing: The finishing step is the final phase of profile milling, where the last layer of material is removed. The focus here is on achieving a smooth surface and precise dimensions. Smaller, more precise tools are used in this stage to ensure a high-quality surface finish, tight tolerances, and the desired final shape. This step ensures that the part meets all specifications and has the smooth, polished finish required for its intended application.
Each of these steps is essential for producing complex, high-precision parts. By gradually removing material in stages, profile milling allows for fine control over the final shape, ensuring both accuracy and quality.
3.Commonly Used Tools
Selecting the right tool is essential for achieving the best results in profile milling. The type of material being machined, as well as the complexity of the part, determines which tool should be used. Here are some of the most commonly used tools in profile milling:
3.1 End Mills and Ball End Mills:
These are versatile cutting tools used for machining softer materials like plastics and aluminum. End mills have flat cutting edges and are ideal for cutting horizontal or vertical surfaces, slots, and pockets. Ball end mills, with a rounded cutting edge, are perfect for creating smooth, curved surfaces, contours, and 3D shapes. Both tools are commonly used when machining parts that require detailed shapes and finishes.
3.2 Carbide or Diamond-Tipped Tools:
For harder materials such as stainless steel, titanium, or hardened metals, carbide and diamond-tipped tools are often the best choice. These tools are highly durable, resistant to wear, and capable of withstanding high temperatures during the machining process. Carbide tools are particularly known for their ability to cut through tough materials at faster speeds, while diamond-tipped tools provide exceptional hardness and are used for cutting abrasive materials with extreme precision.
3.3 Roughing Tools:
In the roughing stage of profile milling, large amounts of material need to be removed quickly and efficiently. Roughing tools are designed to do just that. They often feature a more aggressive cutting edge and are capable of removing large sections of material without compromising the overall integrity of the part. Common roughing tools include round inserts and high-feed cutters, which help speed up the material removal process and prepare the workpiece for finer machining.
3.4 Finishing Tools:
After roughing, finishing tools are used to refine the part, ensuring a smooth surface and precise dimensions. These tools are typically smaller and more specialized to achieve high-quality finishes and tight tolerances. Finishing end mills often have chamfered edges to minimize tool marks and produce smooth surfaces. The choice of finishing tool depends on the final surface quality required for the part, such as whether a polished, matte, or textured finish is needed.
Each tool serves a specific function in the milling process, and using the right tool for the material and operation is crucial for achieving both efficiency and accuracy.
4.Steps for Successful Profile Milling
To achieve the best results in profile milling, it’s important to follow a series of key steps. Each step helps ensure precision, efficiency, and a high-quality finish. Here’s an overview of the essential steps:
4.1 Selecting the Right Tool
Choosing the appropriate cutting tool is crucial for the success of the milling process. The tool should be selected based on both the material being machined and the complexity of the part. For softer materials like plastics or aluminum, standard end mills or ball end mills are typically used. For harder materials like stainless steel or titanium, carbide or diamond-tipped tools are more suitable. The complexity of the part may require specialized tools, such as ball nose end mills for detailed contours or roughing tools for rapid material removal.
4.2 Pre-Treating the Surface
Before beginning the milling process, it may be necessary to pre-treat the surface of the workpiece to prepare it for machining. If the material is particularly hard or if you are working with large sections, using a diamond saw can help remove rough excess material. This step helps to avoid excessive wear on the cutting tools during the roughing stage and ensures smoother, more efficient machining.
4.3 Setting the Depth of Cut
The depth of cut determines how much material is removed in each pass of the milling tool. It’s important to set the depth of cut according to the hardness of the material being machined. Softer materials can tolerate deeper cuts, while harder materials require shallower cuts to avoid excessive tool wear and minimize vibrations. Proper depth settings help improve cutting efficiency and reduce the chances of tool deflection, leading to better surface finish and dimensional accuracy.
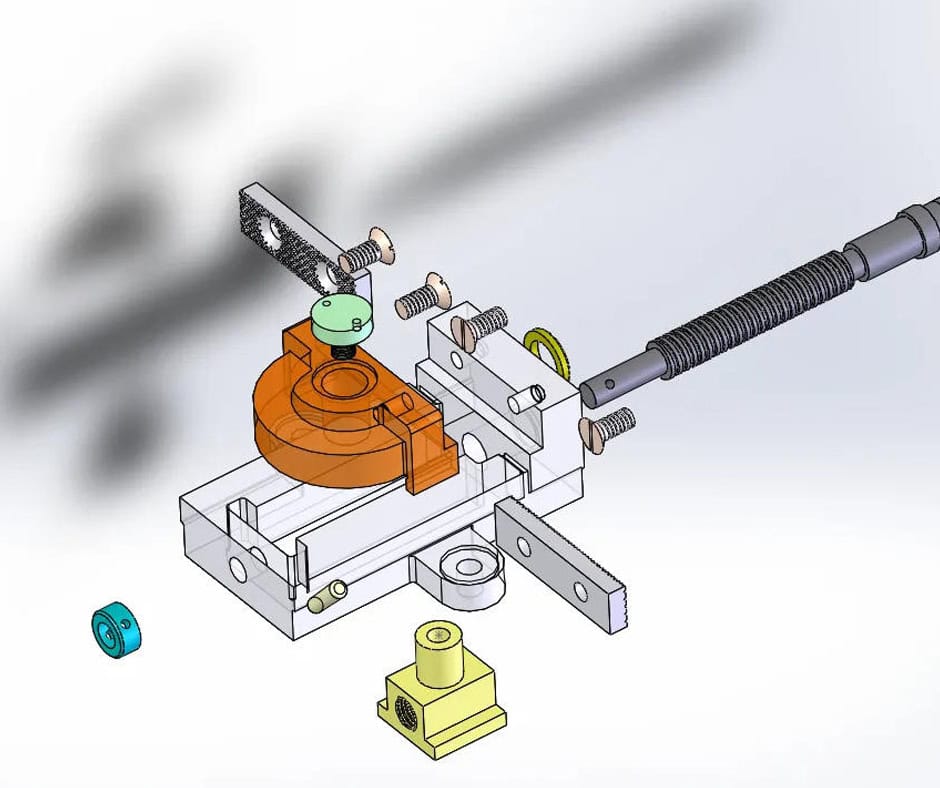
4.4 Fixing the Workpiece
Accurate machining starts with properly securing the workpiece. Fixing the workpiece firmly in place is essential to avoid any movement during the milling process, which can lead to inaccurate cuts or surface imperfections. Workpieces can be secured using clamps, vices, or a custom fixture, depending on the size and shape of the part. The workpiece must be aligned properly with the milling machine to ensure the tool cuts in the correct direction and depth.
4.5 Finish Cutting
After the roughing and semi-finishing operations, the final finish cutting step is performed to refine the part’s surface and achieve the desired finish. It is important to ensure that the tool does not cause damage to the workpiece during retraction, especially after completing the cut. When retracting the tool, it should be lifted carefully to avoid scraping or gouging the part. Additionally, ensure that the cutting speed is appropriate to prevent tool chatter or vibration that could negatively impact the surface quality.
By following these steps—carefully selecting the right tool, preparing the workpiece, setting the correct depth of cut, fixing the part securely, and performing the final finishing cut—profile milling can be completed efficiently and with high precision, resulting in high-quality parts that meet the required specifications.
5.Tips for Optimizing Profile Milling Operations
To maximize the efficiency and quality of profile milling, it’s essential to consider several key factors that can enhance both the performance of the operation and the longevity of the tools. Here are some practical tips for optimizing the process:
5.1 Matching Tool and Material
Choosing the right tool for the material you’re machining is crucial. The properties of the material—such as its hardness, toughness, and heat resistance—should guide your tool selection. For example, softer materials like aluminum and plastics work well with standard end mills or ball end mills, while harder materials like stainless steel or titanium require carbide or diamond-tipped tools. Using the correct tool not only ensures better performance but also prevents unnecessary wear and tear on the tool, improving the overall efficiency of the milling operation.
5.2 Adjust Cutting Speed and Feed Rate
Finding the right balance between cutting speed and feed rate is essential for optimizing material removal while maintaining tool life. The cutting speed refers to how fast the tool moves through the material, while the feed rate is the speed at which the tool moves along the workpiece. If the cutting speed is too high or the feed rate is too fast, it can cause excessive wear on the tool, reduce the quality of the finish, and increase the risk of damage to the workpiece. On the other hand, too slow a speed or feed rate can reduce machining efficiency. The key is to adjust these parameters to match the material being cut, the tool type, and the desired surface finish, allowing for smooth, efficient cuts while extending tool life.
5.3 Avoid Overspeed
It’s important to stay within the machine’s recommended speed range to prevent damage to both the tool and the workpiece. Going beyond the maximum recommended cutting speed can result in overheating, excessive vibration, and even tool failure. This can lead to poor surface finishes, inaccuracies, and shorter tool life. Always consult the manufacturer’s guidelines for the optimal speed settings for both the material and the tool being used, and avoid pushing the machine beyond its limits to ensure smooth, controlled operations.
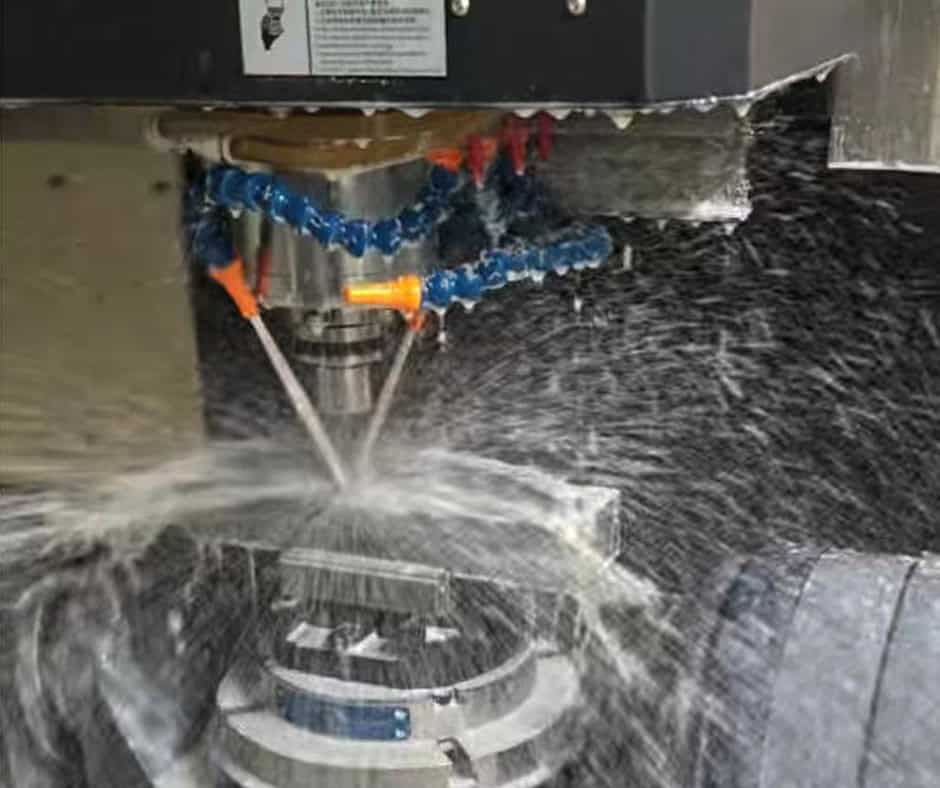
5.4 Use the Correct Cutting Fluid
Using the right cutting fluid is another crucial aspect of profile milling. Cutting fluids help to cool the tool and workpiece, reducing heat buildup that can cause tool wear and material deformation. They also lubricate the cutting edge, reducing friction and improving the quality of the cut. Choosing the correct fluid for the material you’re working with is important; for example, water-based coolants are typically used for metals, while oils may be more appropriate for plastics or composites. Not only does the right cutting fluid extend the tool’s life, but it also helps achieve a smoother surface finish on the part.
By following these tips—matching the tool to the material, adjusting the cutting speed and feed rate, avoiding overspeed, and using the right cutting fluid—you can significantly enhance the performance, accuracy, and efficiency of your profile milling operations, resulting in high-quality parts and longer tool life.
6.Common Challenges and Solutions
In profile milling, several challenges can arise that impact the quality of the part and the efficiency of the operation. Below are some common issues and practical solutions to address them:
6.1 Tool Wear and Breakage
Tool wear and breakage can occur when the cutting tool is not properly selected or when cutting conditions are not optimized. To reduce tool wear and prevent breakage, it’s essential to:
6.2 Chatter and Vibration
Chatter and vibration can lead to poor surface finishes, reduced tool life, and inaccurate cuts. To minimize these issues, try the following solutions:
6.3 Poor Surface Finish
A rough or inconsistent surface finish can be a sign that the milling process needs adjustments. To improve surface quality:
6.4 Material Deformation
Material deformation, such as warping or bending, can occur if the workpiece isn’t properly secured or if excessive force is applied during cutting. To prevent deformation:
By understanding these common challenges and implementing the right solutions—such as choosing the correct tools, optimizing cutting parameters, and ensuring proper workpiece setup—you can improve the quality and efficiency of your profile milling operations while minimizing potential issues.
7.Advanced Techniques for Profile Milling
Here are three advanced milling techniques that can enhance efficiency, reduce wear, and improve overall machining quality:
7.1 Trochoidal Milling
7.2 Adaptive Clearing
7.3 High-Efficiency Milling (HEM)
These advanced techniques—trochoidal milling, adaptive clearing, and high-efficiency milling—are proven methods for improving milling performance. They enhance material removal efficiency, extend tool life, and reduce machining time, making them valuable tools for modern CNC machining operations.
8.Case Studies and Real-World Examples
8.1 Aerospace Components
8.2 Automotive Parts
8.3 Medical Devices
9.Safety Considerations in Profile Milling
9.1 Personal Protective Equipment (PPE)
9.2 Machine Guarding
9.3 Emergency Procedures
10.Environmental and Sustainability Considerations
10.1 Recycling and Reusing Materials
10.2 Energy Efficiency
10.3 Sustainable Tooling
11.Future Trends in Profile Milling
11.1 Automation and Robotics
11.2 Artificial Intelligence and Machine Learning
11.3 Additive Manufacturing Integration
12. Conclusion
Profile milling is an efficient machining technique that produces high-quality results, speeds up production, and helps equipment last longer. By choosing the right tools, adjusting machining settings, and following safety guidelines, manufacturers can ensure better performance and dependability.